Spring4.3.x源码阅读-IOC
南京雨花吴彦祖 • 1 年前 • 4051 次点击 •
前言
作为Java程序员,一定会和Spring打交道,最初学习Spring的时候,也是跟着视频,按照老师的操作,一步步学着如何使用Spring,慢慢的,了解到一些重点概念,比如IOC,AOP等,当初学习的时候就觉得Spring好神奇,好厉害,就越发的想要了解其背后的原理,下文会围绕Spring的核心概念以及工作中会接触到的知识点,来阅读Spring的源码,揭开Spring的神秘面纱。
如何阅读源码?
作为一个程序员,不仅需要能够使用各种不同的技术,并且需要了解这些技术底层的原理,阅读源码是程序员的必备技能之一,那么对新技术,新框架,应该要如何正确的去阅读源码呢?下面是我个人的一些观点,如果你有更好的方法,也可以分享给大家,让大家也能学习优秀程序员的学习习惯。
首先要会使用这项技术,只有能够熟练的使用了,再去了解底层的源码才能够得心应手了解该技术的重点概念及知识,这一点,其实在学习使用技术的时候,也会慢慢接触,会有一个基本印象阅读源码不像读书,从头看到尾,而是有重点的去看,并不需要了解这项技术的所有细节,看不完的阅读源码的时候应该由契合重点概念及核心知识的小demo入手,由浅入深,了解简单demo背后的原理阅读源码不需要一次性看完所有重点,当在工作中碰到某个知识点的使用的时候,想要了解背后的原理,可以针对这个点来看相关的源码
什么是IOC?
所谓IOC就是控制反转,之前,对象都由我们去创建,现在将创建对象的工作交给Spring,并且让Spring去控制管理这些对象,在Spring中将对象称为bean,bean翻译为豆子,豆形种子,豆科植物,Spring翻译为春天,Spring是一个容器,用来容纳这些bean,在春天里,这些bean在Spring容器的土壤中生根发芽,历经枯荣(bean的生命周期),有了Spring,程序员也更加轻松,因此Spring是程序员的春天。
Spring如何创建对象?
了解了什么是IOC,那么Spring是如何去帮助我们创建对象的呢?不妨回忆一下最开始学习的时候,是如何使用Spirng的,相信大家对这个demo一定不陌生:
在xml文件中配置bean的信息
复制代码
通过ClassPathXmlApplicationContext类读取该xml文件,然后通过getBean()去获取需要的bean对象
复制代码public class IOCTest {
    public static void main(String[] args) {
        //读取xml文件
        ApplicationContext context = new ClassPathXmlApplicationContext("beans.xml");
        System.out.println(context.getBean("user"));
    }
}
现在,就从这个demo入手,去深入了解Spring是如何创建一个对象的。首先,需要介绍一下ClassPathXmlApplicationContext,见名知意,这个类是针对classpath,即类路径下的xml文件的,它属于ApplicationContext,即应用上下文。
上下文的含义就像一篇文章的上文和下文一样,这个概念我也是接触多了,然后自己认为这样比较好理解,你在文章的当前段落,可以看到该文章上面的段落和下面的段落,这里的文章就是应用,通过ApplicationContext,可以在应用中任何地方获取到放在ApplicationContext中的东西,也就是说ApplicationContext就是应用的容器,用来装应用中的对象
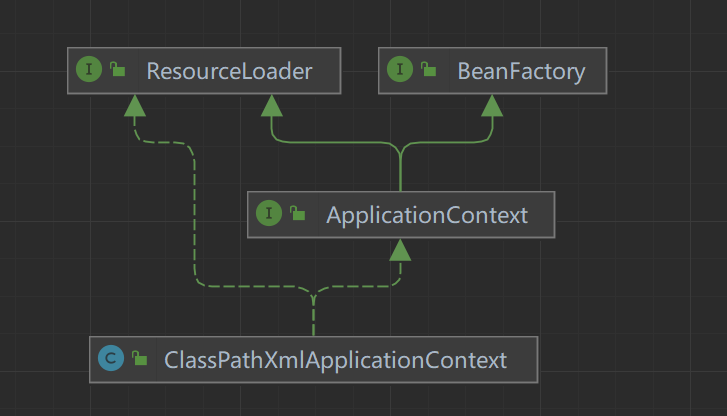
简化关系图
这里再补充一下,接口是代表行为的,类是代表从属关系的,即接口代表能不能,类代表是不是,例如飞机是交通工具类,老鹰是鸟类,它们都能飞(行为)
由上面的简化关系图可知,ClassPathXmlApplicationContext能够加载资源(ResourceLoader),能够创建,获取bean(BeanFactory),通过它可以操作Spring这个容器,或者也可以理解为,它就是容器。
要想了解Spring是如何创建对象的,首先需要知道,在创建ClassPathXmlApplicationContext的过程中,到底做了什么,下面就开始逐步深入。
构造方法注释
复制代码public ClassPathXmlApplicationContext(String[] configLocations, boolean refresh, ApplicationContext parent) throws BeansException {
    //本质上就是创建了一个AbstractApplicationContext对象,同时指定了资源解析器
    super(parent);//parent:null
    //设置context的configLocations属性,本类中没有这个属性,继承而来
    setConfigLocations(configLocations);
    if (refresh) {//true,自动刷新上下文,加载所有的beanDefiniton,创建所有的单例,false则需要手动调用
        refresh();
    }
}
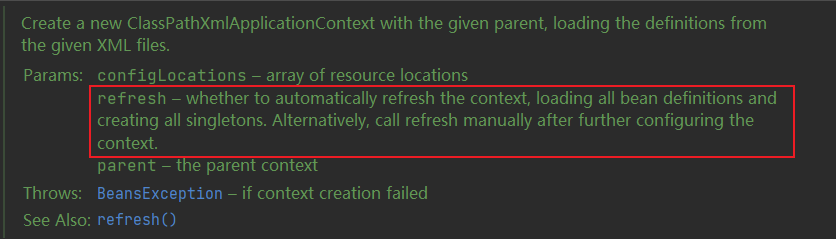
在这个构造方法中,前两行代码并不是很重要,就是创建了context对象,并且设置了configLocations属性,即告诉context去哪里找xml配置文件。
重要的是refresh()方法,通过注释可以看到,这个方法会自动刷新context,加载所有的beanDefiniton,创建所有的单例对象,也就是说,我们需要的对象是在这个方法中创建出来的,这个方法到底做了什么,继续往下看。
上面这段话中有一些陌生的概念:
beanDefiniton(bean的定义信息)
也就是我们自己定义的bean的信息,它是哪个类,有哪些属性,这些属性的值是什么
单例对象
这个就涉及到了单例模式,Spring是采用单例模式的,即一个类只有一个对象
refresh()方法及内部重要方法
先来看一下refresh()方法的源码:
复制代码public void refresh() throws BeansException, IllegalStateException {
    synchronized (this.startupShutdownMonitor) {
        /**
             * 为context刷新做一些准备工作
             * 设置容器启动时间
             * 设置活跃状态为true
             * 设置关闭状态为false
             * 获取Environment对象,并加载当前系统的属性值到该对象中
             * 准备监听器和事件的集合对象,默认为空集合
             */
        prepareRefresh();

        // Tell the subclass to refresh the internal bean factory.
        //创建了DefaultListableBeanFactory,同时将beanDefinition放进了map(debug打点)
        ConfigurableListableBeanFactory beanFactory = obtainFreshBeanFactory();

        // Prepare the bean factory for use in this context.
        //beanFactory准备工作,对beanFactory各种属性进行填充
        prepareBeanFactory(beanFactory);

        try {
            // Allows post-processing of the bean factory in context subclasses.
            //由子类覆盖方法做额外处理,此处我们一般不做任何扩展
            postProcessBeanFactory(beanFactory);

            // Invoke factory processors registered as beans in the context.
            //调用各种BeanFactoryPostProcessor
            invokeBeanFactoryPostProcessors(beanFactory);

            // Register bean processors that intercept bean creation.
            //注册BeanPostProcessor,并没有调用
            registerBeanPostProcessors(beanFactory);

            // Initialize message source for this context.
            //用于国际化处理
            initMessageSource();

            // Initialize event multicaster for this context.
            //初始化事件事件广播器
            initApplicationEventMulticaster();

            // Initialize other special beans in specific context subclasses.
            //留给子类扩展,初始化子类的bean
            onRefresh();

            // Check for listener beans and register them.
            //注册监听器
            registerListeners();

            // Instantiate all remaining (non-lazy-init) singletons.
            //实例化非懒加载的单例对象
            finishBeanFactoryInitialization(beanFactory);

            // Last step: publish corresponding event.
            finishRefresh();
        }

        catch (BeansException ex) {
            if (logger.isWarnEnabled()) {
                logger.warn("Exception encountered during context initialization - " +
                            "cancelling refresh attempt: " + ex);
            }

            // Destroy already created singletons to avoid dangling resources.
            destroyBeans();

            // Reset 'active' flag.
            cancelRefresh(ex);

            // Propagate exception to caller.
            throw ex;
        }

        finally {
            // Reset common introspection caches in Spring's core, since we
            // might not ever need metadata for singleton beans anymore...
            resetCommonCaches();
        }
    }
}
prepareRefresh()方法
现在先来了解一下
prepareRefresh()到底做了什么
复制代码protected void prepareRefresh() {
    //设置一些初始值,比如启动时间,一些标志位
    this.startupDate = System.currentTimeMillis();
    this.closed.set(false);
    this.active.set(true);

    if (logger.isInfoEnabled()) {
        logger.info("Refreshing " + this);
    }

    // Initialize any placeholder property sources in the context environment
    //这是一个空方法,留给子类扩展
    initPropertySources();

    // Validate that all properties marked as required are resolvable
    // see ConfigurablePropertyResolver#setRequiredProperties
    //验证required的属性不能为null(vm options)
    getEnvironment().validateRequiredProperties();

    // Allow for the collection of early ApplicationEvents,
    // to be published once the multicaster is available...
    //创建一个空的Set
    this.earlyApplicationEvents = new LinkedHashSet();
}
在这个方法中,initPropertySources()是抽象类AbstractApplicationContext中的空方法,可以通过子类继承,然后重写的方式,由我们自己去扩展。
getEnvironment().validateRequiredProperties()是去验证一些required的vm options不能为null
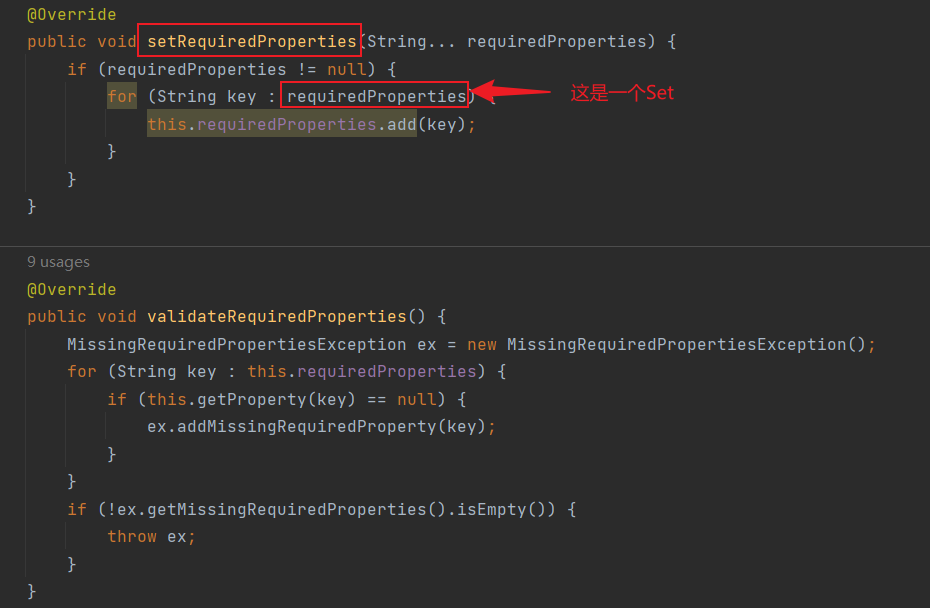
设置属性和验证属性
默认情况下,这个requiredProperties的size为0,因为required的属性需要由我们自己去指定,也就是需要由我们去告诉Spring,启动的时候需要哪些属性,否则就不能启动。
那又该在哪里去指定这些属性呢?当然是在验证属性是否为null的前一步,即initPropertySources()中指定必需属性,现在,来写一个自己的类,继承ClassPathXmlApplicationContext(它间接的继承了AbstractApplicationContext)
复制代码public class MyXMLContext extends ClassPathXmlApplicationContext {
    //构造方法,直接调用ClassPathXmlApplicationContext的构造方法,即跟上面流程一样
    public MyXMLContext(String... configLocations){
        super(configLocations);
    }
    //抽象类是不能被实例化的,当调用抽象类的该方法时,会调用其子类的该方法
    @Override
    protected void initPropertySources() {
        System.out.println("扩展initPropertySources....");
        //要求必须提供MYSQL_HOST参数(vm options),否则不能正常启动
        getEnvironment().setRequiredProperties("MYSQL_HOST");
    }

    public static void main(String[] args) {
        MyXMLContext context = new MyXMLContext("beans.xml");
        System.out.println(context.getBean("user"));
    }
}
首先,不指定MYSQL_HOST属性启动,则会报错

不指定异常图
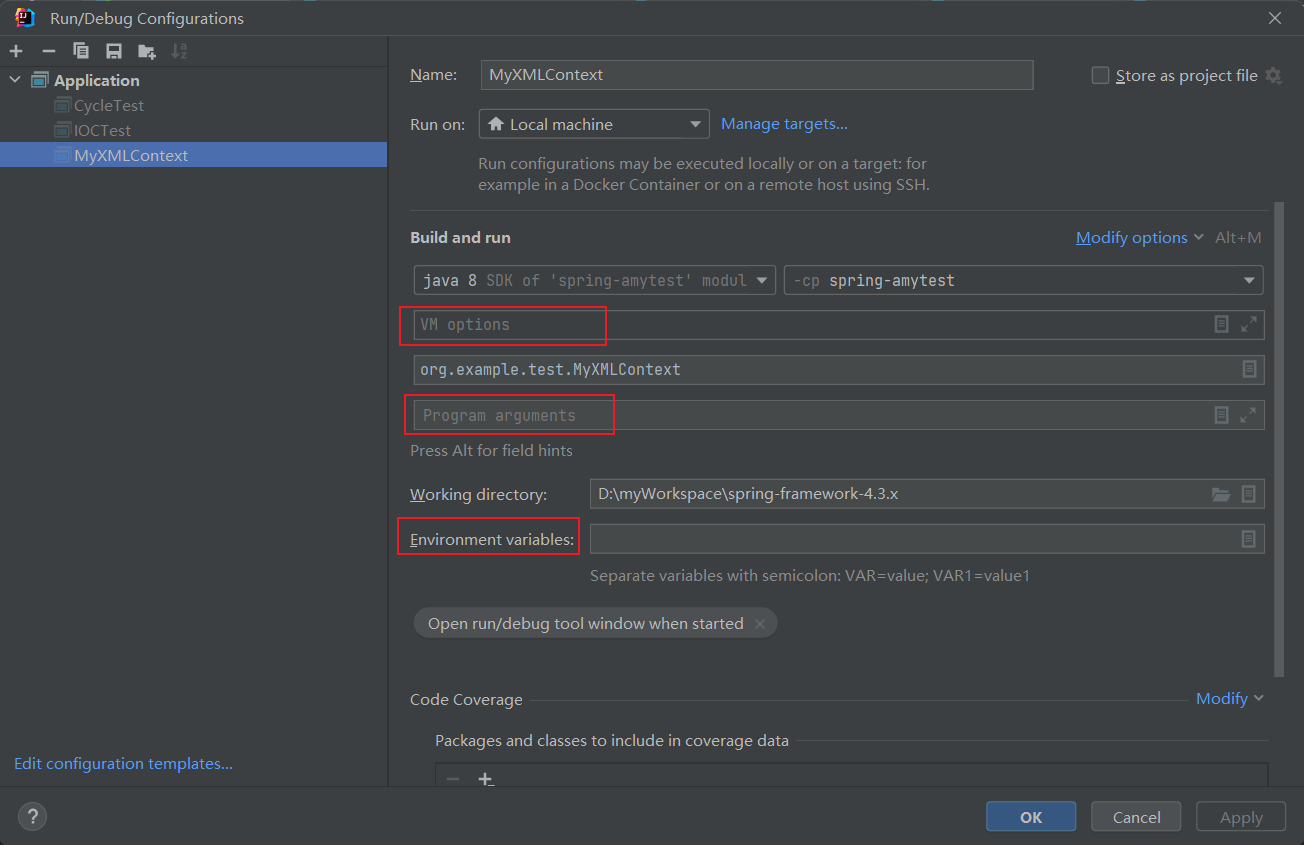
接着,在idea中通过-D指定该vm属性,在VM options中填入-DMYSQL_HOST=127.0.0.1,然后发现能够正常启动,不报错
idea配置面板
这里说一下,
VM Options,Program Arguments,Environment Variables的区别,VM Options是JVM参数,Program Arguments是交给main方法的args的参数,Environment Variables是环境变量,安装JDK,配置操作系统的环境变量就是这个东西
参数
使用方法
实例
代码获取方式
VM Options
必须以-D 、 -X 、 -XX 开头,每个参数用空格隔开
-Dvm.key=VmKey -Xms2048m
String key = System.getProperty(“vm.key”);
Program Arguments
每个参数用空格隔开
p.key=Program_Key p.name=ProgramName p.age=18
main(String[] args)
Environment Variables
其优先级低于 VM options ,即如果VM options 有一个变量和 Environment variable中的变量的key相同,则以VM options 中为准, 以分号分割多个
env.key=env_james;server.servlet.context-path=/test;server.port=8080
String envKey = System.getenv(“env.key”);
obtainFreshBeanFactory()方法
见名知意,通过这个方法,可以获得一个BeanFactory
复制代码protected ConfigurableListableBeanFactory obtainFreshBeanFactory() {
    //创建了beanFactory
    refreshBeanFactory();
    //将上面创建的beanFactory进一步包装为ConfigurableListableBeanFactory
    ConfigurableListableBeanFactory beanFactory = getBeanFactory();
    if (logger.isDebugEnabled()) {
        logger.debug("Bean factory for " + getDisplayName() + ": " + beanFactory);
    }
    return beanFactory;
}
这个方法中重要的是refreshBeanFactory()
复制代码protected final void refreshBeanFactory() throws BeansException {
    if (hasBeanFactory()) {//false
        destroyBeans();
        closeBeanFactory();
    }
    try {
        //创建一个DefaultListableBeanFactory
        DefaultListableBeanFactory beanFactory = createBeanFactory();
        //设置序列化id
        beanFactory.setSerializationId(getId());
        //可以自定义beanFactory
        customizeBeanFactory(beanFactory);
        //在这个方法中将beanDefinition放到了beanFactory的beanDefinitionMap中
        loadBeanDefinitions(beanFactory);
        synchronized (this.beanFactoryMonitor) {
            this.beanFactory = beanFactory;
        }
    }
    catch (IOException ex) {
        throw new ApplicationContextException("I/O error parsing bean definition source for " + getDisplayName(), ex);
    }
}
上面的代码中有一个可以自定义的地方,通过继承并重写AbstractRefreshableApplicationContext中的customizeBeanFactory()方法,可以自定义DefaultListableBeanFactory的任何设置,在默认情况下,customizeBeanFactory()方法什么也没做,这两个标志位,默认都为true,即默认允许重写BeanDefinition,允许循环引用
复制代码protected void customizeBeanFactory(DefaultListableBeanFactory beanFactory) {
    if (this.allowBeanDefinitionOverriding != null) {//null
        beanFactory.setAllowBeanDefinitionOverriding(this.allowBeanDefinitionOverriding);
    }
    if (this.allowCircularReferences != null) {//null
        beanFactory.setAllowCircularReferences(this.allowCircularReferences);
    }
}
什么是循环引用?这个将在其他文章中进行讲解
在上面的代码中,已经将beanFactory创建出来了,beanFactory是用来创建Bean的,要创建bean,首先需要将我们自己定义的bean的信息告诉它,即beanDefinition,它才能根据里面的信息来创建,所以loadBeanDefinitions()是非常重要的方法
复制代码protected void loadBeanDefinitions(DefaultListableBeanFactory beanFactory) throws BeansException, IOException {
    // Create a new XmlBeanDefinitionReader for the given BeanFactory.
    //给BeanFactory创建一个XmlBeanDefinitionReader,它是一个读取器,读取xml文件中的beanDefinition
    XmlBeanDefinitionReader beanDefinitionReader = new XmlBeanDefinitionReader(beanFactory);

    // Configure the bean definition reader with this context's
    // resource loading environment.
    //开始给beanDefinitionReader填充一些属性
    beanDefinitionReader.setEnvironment(this.getEnvironment());
    //this是ClassPathXmlApplicationContext,它继承了一个configLocations的属性
    //相当于告诉beanDefinitionReader xml文件的位置
    beanDefinitionReader.setResourceLoader(this);
    //设置解析器
    beanDefinitionReader.setEntityResolver(new ResourceEntityResolver(this));

    // Allow a subclass to provide custom initialization of the reader,
    // then proceed with actually loading the bean definitions.
    //允许自定义beanDefinitionReader的初始化方法,通常不需要自定义
    initBeanDefinitionReader(beanDefinitionReader);
    //开始loadBeanDefinitions
    loadBeanDefinitions(beanDefinitionReader);
}

beanDefinitionReader属性图
跳过一些不重要的代码,来看核心代码,其位于XmlBeanDefinitionReader类和DefaultBeanDefinitionDocumentReader类中,核心方法调用流程图如下:
整个过程可以概括为,Spring通过XmlBeanDefinitionReader和DefaultBeanDefinitionDocumentReader去读取xml文件,将其中的标签进行解析,对于bean标签,会解析出beanName和beanDefinition
beanName:和bean标签中的id的值相同beanDefinition:bean的定义信息,记录了bean的类,属性值等信息
然后会将二者以键值对的形式放入到beanDefinitionMap中,它是一个初始大小为256的ConcurrentHashMap,另外,还将beanName放入到一个大小为256的ArrayList中
上面提到的只是针对于xml文件来创建对象的过程,如果是以注解的形式,就会有所不同,比如使用的是AnnotatedBeanDefinitionReader,但是大致的过程还是差不多的。
invokeBeanFactoryPostProcessors()方法
这个方法是调用BeanFactoryPostProcessor,PostProcessor翻译过来是后置处理器,即创建BeanFactory之后,实例化bean之前,可以进行一些处理操作。
BeanFactoryPostProcessor到底有什么作用呢?主要是在bean实例化之前,对bean的定义进行修改,例如,可以修改bean的scope,是否懒加载,是否抽象,以及bean的属性值。
如何使用BeanFactoryPostProcessor?
要使用BeanFactoryPostProcessor,需要创建一个实现了BeanFactoryPostProcessor接口的类,并且重写postProcessBeanFactory(),在这个方法中,能够获取到ConfigurableListableBeanFactory,通过它,可以对bean的定义进行修改。
复制代码public class CustomBeanFactoryPostProcessor implements BeanFactoryPostProcessor {

    @Override
    public void postProcessBeanFactory(ConfigurableListableBeanFactory beanFactory) throws BeansException {
        System.out.println("user-----执行了BeanFactoryPostProcessor方法.......");
        // 获取bean定义
        BeanDefinition beanDefinition = beanFactory.getBeanDefinition("user");
        // 修改bean定义
        beanDefinition.setScope(BeanDefinition.SCOPE_PROTOTYPE);
    }
}
Spring是如何知道要调用哪些BeanFactoryPostProcessor,调用的顺序又是怎样的?
核心代码:
复制代码//BeanDefinitionRegistryPostProcessor继承了BeanFactoryPostProcessor接口
//就理解为BeanFactoryPostProcessor就行了
String[] postProcessorNames =
    beanFactory.getBeanNamesForType(BeanDefinitionRegistryPostProcessor.class, true, false);
简单来说,就是判断我们注册的bean是不是BeanFactoryPostProcessor类型的,如果是就收集起来,然后开始执行这些BeanFactoryPostProcessor
BeanFactoryPostProcessor的执行顺序如下:
实现了PriorityOrdered接口的,需要重写getOrder()其返回一个整数,整数越小,优先级越高实现了Ordered接口的,需要重写getOrder()其返回一个整数,整数越小,优先级越高调用其他的BeanFactoryPostProcessor
finishBeanFactoryInitialization()方法
根据注释,可以知道,在这个方法中创建(实例化+初始化)了所有的非懒加载的单例对象,方法内部比较复杂,其核心代码是通过反射来创建bean
复制代码Constructor ctor = clazz.getDeclaredConstructor();//无参构造器
Object object = ctor.newInstance();//创建对象
上面的核心代码仅仅是完成了实例化的过程,没有完成初始化过程,即还未对对象的属性进行填充

创建bean的主要过程图
之后就是初始化阶段,首先,对象填充属性的过程,通过populateBean()方法来给对象填充属性,填充完属性之后,会调用initializeBean()方法,在这个方法中,主要有4个步骤:
调用aware接口的方法调用beanPostProcessor的前置增强方法调用init方法调用beanPostProcessor的后置增强方法
复制代码protected Object initializeBean(final String beanName, final Object bean, RootBeanDefinition mbd) {
    if (System.getSecurityManager() != null) {
        AccessController.doPrivileged(new PrivilegedAction() {
            @Override
            public Object run() {
                invokeAwareMethods(beanName, bean);
                return null;
            }
        }, getAccessControlContext());
    }
    else {
        //调用aware接口的方法
        invokeAwareMethods(beanName, bean);
    }

    Object wrappedBean = bean;
    if (mbd == null || !mbd.isSynthetic()) {
        //前置增强
        wrappedBean = applyBeanPostProcessorsBeforeInitialization(wrappedBean, beanName);
    }

    try {
        //init方法
        invokeInitMethods(beanName, wrappedBean, mbd);
    }
    catch (Throwable ex) {
        throw new BeanCreationException(
            (mbd != null ? mbd.getResourceDescription() : null),
            beanName, "Invocation of init method failed", ex);
    }

    if (mbd == null || !mbd.isSynthetic()) {
        //后置增强
        wrappedBean = applyBeanPostProcessorsAfterInitialization(wrappedBean, beanName);
    }
    return wrappedBean;
}
上面的第2步和第4步,就是我们通常说的AOP,对于AOP,将在其他文章进行介绍
总结
Spring可以看作是一个容器,用来装我们需要的对象,它有一个比较重要的概念是IOC,即控制反转,将对象的控制权交给Spring,由Spring来创建对象。
容器和对象的创建流程主要分为以下几个步骤:
先创建容器,即BeanFactory通过BeanDefinitionReader读取解析各种类型的配置文件,从中解析bean的定义信息,封装成BeanDefinition调用执行BeanFacoryPostProcessor做一些准备工作:注册beanPostProcessor,准备监听器等通过反射实例化对象初始化对象:populateBean(),initializeBean()获取到完整的对象
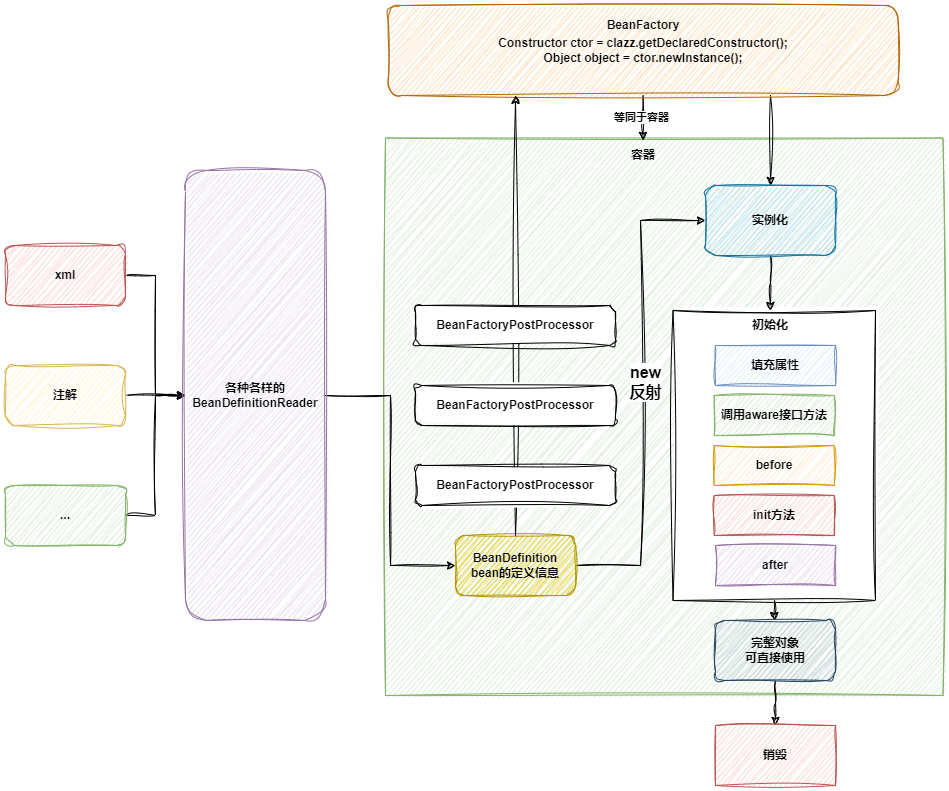
Spring创建对象过程图